In this article, Orb Composer with Logic Pro X tutorial, I explain how to set up Orb Composer with Logic. Orb Composer can be a nice tool to help you out with ideas for new compositions. But it can be a hassle to set this instrument up to play nicely with your specific DAW via midi.
Hexachords provides some tutorials for Studio One. But there is not really any tutorials on setting Orb Composer up with Logic Pro X. In conclusion, I thought I should give it a try and make a tutorial for you!
Install the Orb Composer apps
First install Orb Composer and the Orb Composer MIDI service app, these tools and tutorial for this installation part is provided by Hexachords. If you have questions on this installation part, please contact Hexachords. I am not affiliated with them in any way.
Orb Composer with Logic Pro X
You can download the Logic project template if you want the final setup we create in this tutorial to look at. But I highly suggest you just follow along and do it step by step. Because the Orb channels might differ in your Orb song setup, so you will have to edit those anyway in the Logic Midi Environment.
Furthermore, you also learn the process of working with the Midi Environment in Logic Pro X.
Firstly, let’s launch Logic.
Set up Logic to record multiple midi sources simultaneously on separate tracks
Now go into File->Project Settings->Recording.
Make sure to check that “Auto demix by channel if multitrack recording.” is ACTIVATED (see screenshot below).
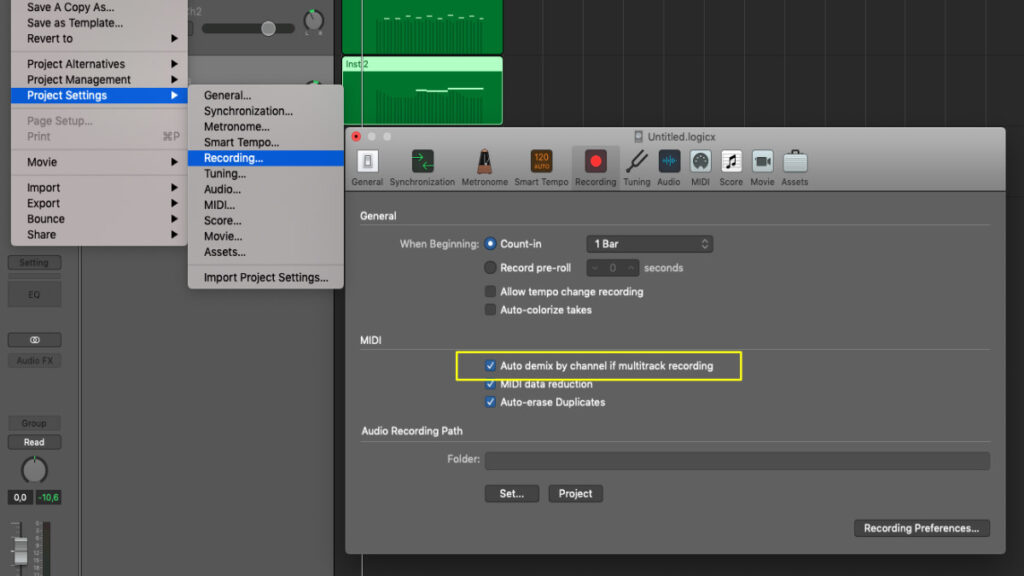
Without this enabled your recorded midi will end up like: One main track as the major midi clip and the other channels will have an aliased copy of that same midi track. So midi data by channel will NOT be split among the tracks. Importantly, this option is crucial if you want to record many midi tracks from various midi sources simultaneously to separate tracks.
Look up the midi sent from Orb Composer
Ok, now we need to create a simple Orb Composer project. I created a simple orchestral song with a simple intro.
If the AI created many midi tracks in Orb Composer, just de-activate / delete / mute everyone except two tracks.
When you test this workflow you will go insane if you have too many tracks playing obnoxious irritating midi notes.
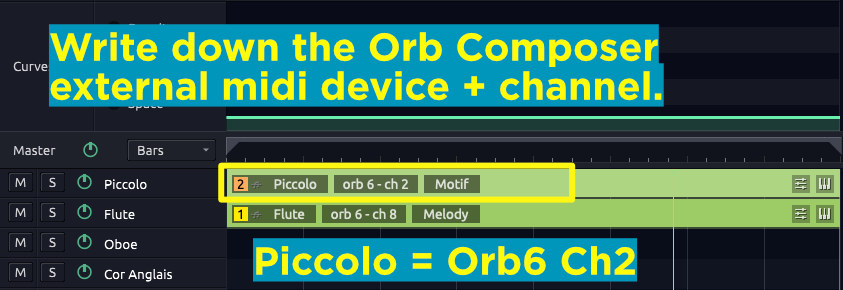
In this example I have two midi tracks in the Orb Composer intro. A piccolo and a flute. The piccolo is sending midi through the external midi device orb6 at channel 2. Importantly, write this down for further reference in the Logic Pro X setup. Something like:
- Piccolo = Orb6 ch2
- Flute = Orb6 ch 8
Creating instrument tracks in Logic to receive midi from Orb Composer
Create a few instrument tracks like in the image below. I create two tracks just to be able to verify that this workflow works properly before continuing and adding more tracks. The more stuff you have in your project, the harder it gets to debug. Keep things simple, trust me!
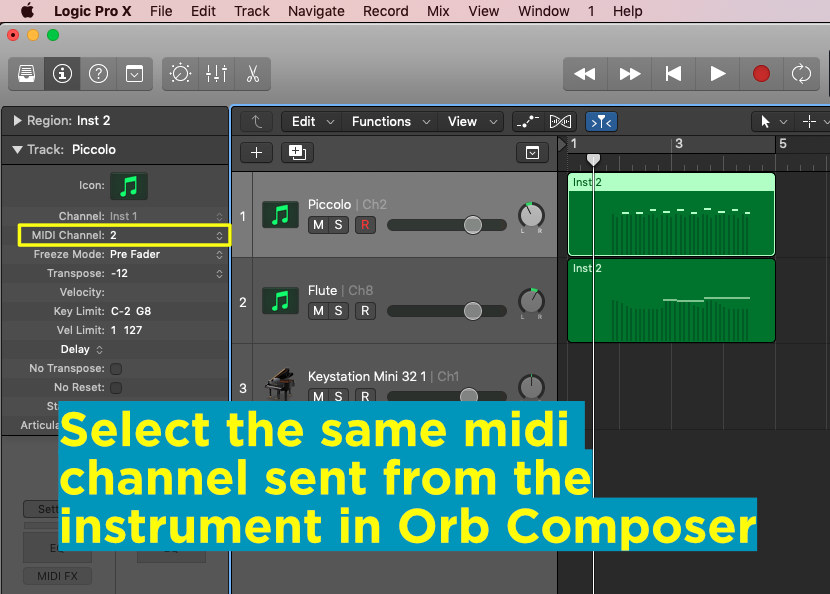
I also set the correct midi channel in the Kontakt Instrument, see image.
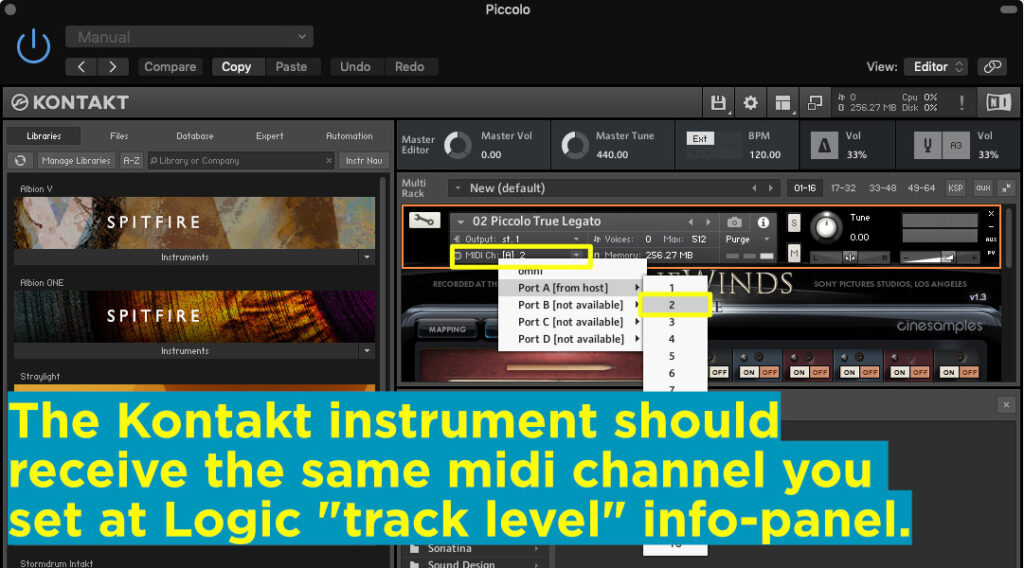
set at Logic “track level” / information panel.
Set up Logic Midi Environment with Orb Composer midi devices
Ok, now open the Midi Environment in Logic Pro X. Shortkey: Cmd+0.
Create the following devices and move them as in the screenshot below:
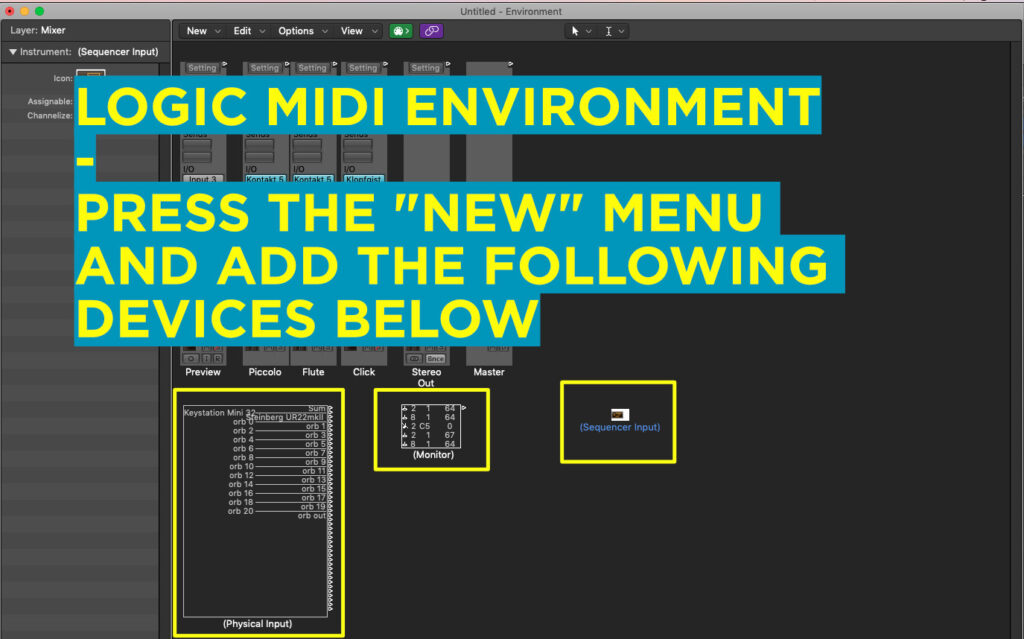
- Physical Input device
- Monitor
- Sequencer Input
If you have the Orb Composer Midi service app installed on your Mac OSX system you should be able to see the various Orb midi devices in the Physical Input Device.
The Monitor Device is a great debug tool to see what kind of midi data Logic recieves on these various midi devices.
The Sequencer Input Device is needed to receive the actual midi data to the sequencer tracks in Logic Pro X. Without it you will not be able to record the incoming midi data.
Connect the Orb Composer Midi devices in Logic Pro X Environment
Let’s make the cable connections to continue this Orb Composer template setup in Logic Pro X.
We know that our Orb Composer track 1, the Piccolo, is sending on midi device Orb 6 Channel 2.
1. Drag a cable from the Orb6 node in the Physical Input Device to the Monitor Device.
2. Drag a cable from the Monitor Device to the Sequencer Input
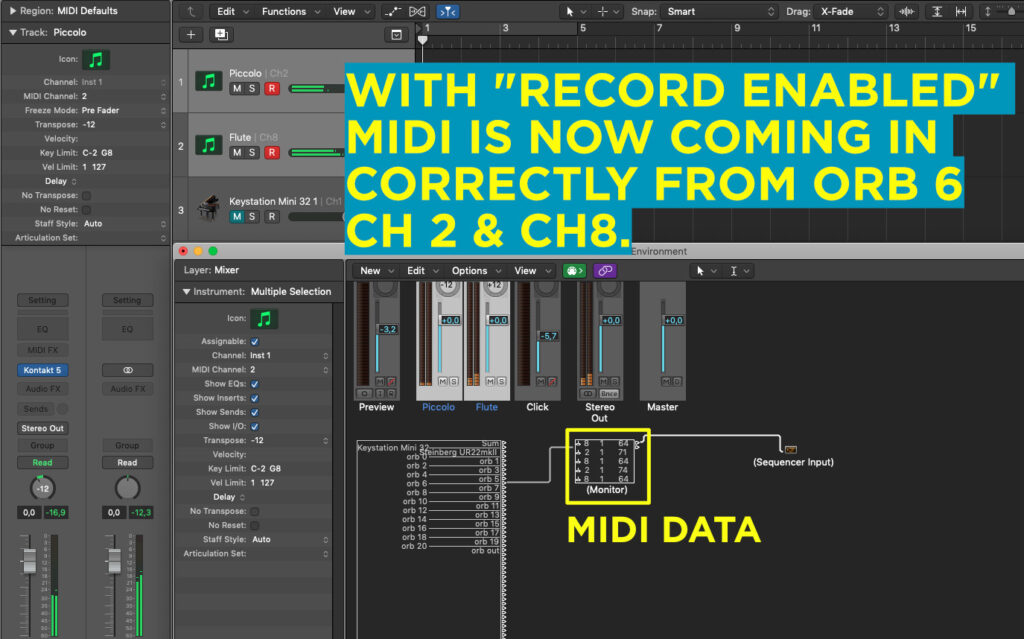
If you now Record Enable the two instrument tracks Logic will receive the midi from Orb Composer on the correct tracks. You can press record and the midi data will be spread to the correct midi track.
So Orb Composer now talks with Logic Pro X?
Yes, but there is a catch. The catch is that without Record Enable the tracks will not be audible. Logic will simply not let the instruments receive the midi data without Record Enable.
And…you can’t yet record the midi onto the tracks in Logic Pro X!!!
There is a fix which requires some more extensive setup in the Logic Pro X Midi Environment.
This might, or might not bother you.
And if you want you can stop this tutorial here and be fine. But remember that you will always need to activate Record to be able to hear the incoming midi data.
Let’s explain the more extensive setup of Orb Composer in Logic Pro X Midi Environment.
HOW TO RECORD THE MIDI OF ORB COMPOSER INTO LOGIC PRO X
In order for your midi to be split onto the different instrument track after record you need to:
- Make sure “Auto demix by channel when multitrack recording” is active (yes, you already have this option “on”).
- Activate R – record on all the relevant track. Let the last active track (the track which turns “light grey”) you press be ANY of these active instrument channels. NOT on a muted track which does not receive any of the midi from Orb.
If you leave the last active track to be the muted (non operating) midi channel. The split will not work.
Additional set up of Orb Composer in Logic Pro X
This part will explain how to make it possible to preview the Orb Composer midi in Logic pro X WITHOUT the Record Enable activate on the tracks.
Open up the Midi Environment again with shortkey CMD+0.
Let’s first explain the problem we are facing. Logic requires the Instrument tracks to be Record Enabled in order to hear the incoming midi data on the tracks, by default.
So we need some kind of routing to “force” the midi data into the Instrument tracks. This is possible with some extra routing and the Transformer Device in Midi Environment of Logic.
How to use the Transformer Device of Logic Midi Environment
With the Transformer Device you can transform and/or filter incoming midi data. So if we have incoming Midi Notes on channel 4 we could transform that to channel 8 instead. Quite handy if we want to do some really elaborate routing.
In this case we will use the Transformer Device as a midi splitter to filter a specific midi channel to one single instrument track.
Add two of these Transformer Devices in the Midi Environment.
We need one for the Piccolo (Orb 6 ch 2), and one for the Flute (Orb 7 ch 8).
- Drag a cable from the Monitor Device (1) to the first Transformer Device (2) .
- Drag a cable from the first Transformer Device (2) to your Piccolo Instrument Mixer Track (3).
Repeat the process for your second instrument, the Flute.
- Drag a cable from the Monitor Device to the second Transformer Device.
- Drag a cable from the second Transformer Device to your Flute Instrument Track.
Your routing should look something like this:
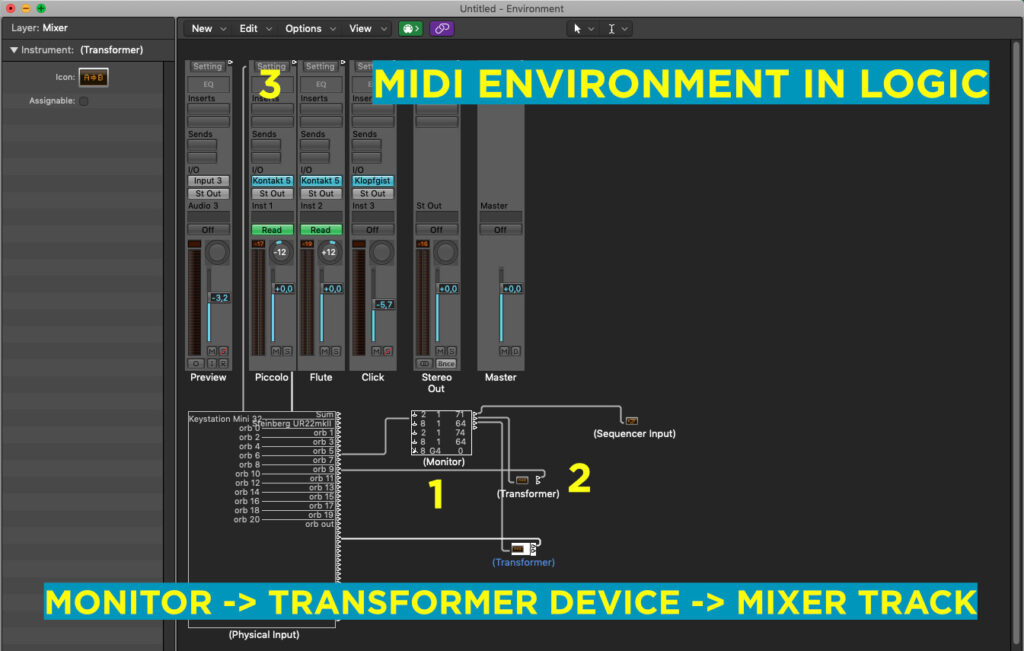
Drag cable from Transformer Device (2) to Instrument Track (3).
Now it’s time to setup the actual filtering for each of these tracks.
Transform “Operations” Panel
Double click the first Transformer Device, the one that is connected to the Piccolo. A new Operations popup page appears for the Transformer.
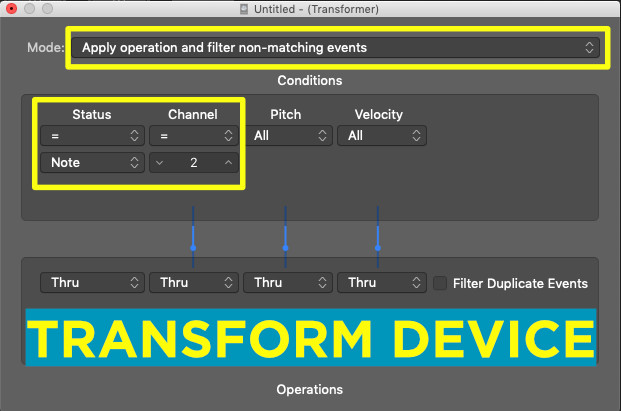
First set the operations Mode to “Apply operation and filter non-matching events.”
This basically means that this transformer will only let through data that matches your filtering condition.
So let’s set the Conditions Status to Equal (=) with value Note. And the Channel to Equal (=) with value 2. Yes, this is our flute coming from Orb 6 at channel 2. Close the Operations panel.
Repeat the process for the second Transformer, but select Channel 8 (Piccolo was incoming at Orb 6 channel 8)
The Orb Composer to Logic routing is now finished!
Now make sure Record Arm is de-activated on your tracks in Logic Pro X.
Enter Orb Composer application and press play.
If you go back to Logic Pro X you should now see both instrumental tracks receiving midi and playing back with the sampler. Even though the tracks Record Arm is de-activated. Our little midi-routing is working perfectly!
It’s by no means a simple solution, but it works. Now you can continue, repeat the process, and add all other midi tracks used in your Orb Composer song.
IMPORTANT – Regarding “clashing” midi channels in Logic Pro X when recording Orb Producer midi.
If you connect the “transformers” to the “Sequencer Input” in the Logic Environment, in order to record the midi data onto the tracks you need to know this!
Logic can NOT receive data on the same (overlapping) midi channels to the Sequencer Input.
Even if you send from different Orb midi devices (ie. Orb 1, Orb 2, Orb 3 etc.). It looks practical in theory and on paper, but in reality Logic receives the data to the sequencer like this:
Let’s say you have the following setup in Orb Composer:
- Orb 1 ch 5 – Flute
- Orb 2 ch 5 – Cello
Now in Logic Environment you will connect Physical Input -> Monitor -> Transform accordingly for both of these.
BUT, when you also do the connection to the Sequencer to audition the incoming midi it can’t distinguish those two channel 5 from each other.
In this scenario the flute and cello will trigger the same midi instrument in Logic Pro X.
In conclusion
In conclusion, you will have to “transform” these two ch5 into something like ch5 and ch 6 internally in the Logic environment (my advice: use the transform object) OR change this directly in Orb Composer (but then, if you swap arrangement, you will have to do this change every time). Not practical…
The end of the Orb Composer Logic Pro X tutorial
I hope you found this tutorial useful. If you found it helpful please subscribe to my Morningdew Media weekly newsletter, and also subscribe to my YouTube channel. Thanks!
If you want a quick showcase / overview of Orb Composer you can watch my video below.
What gear I use in the studio? Check out the Resources Page.
Join my exclusive community: https://www.patreon.com/gelhein
Be sure to sign up to our newsletter for new exciting articles in design, music production and sound design.


 presets")